How To Receive Emails From Your Site Using Only Frontend
Published on by Clint_theDuke
Sending and receiving emails using only front-end technologies (HTML, CSS, and JavaScript) is not entirely possible. However, there are approaches that can achieve similar results. For instance, you can use email forwarding services like Mailgun, SendGrid, or EmailJS, which provide APIs to handle email forwarding in your frontend application.
This article provides a step-by-step guide on how to use EmailJS to handle emails in your frontend application.
1. Setting Up Your EmailJS
Sign up for EmailJS:
Go to the EmailJS website and sign up for a free account. After filling out the registration form, You'll receive a confirmation email to verify your account.
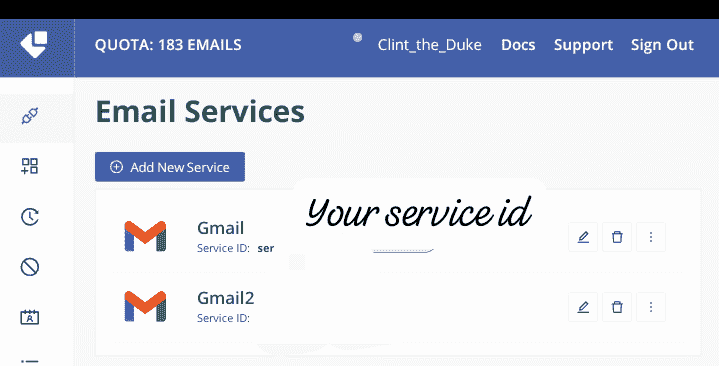
Create a New Service
A service represents an Email service provider used for sending emails such as; Gmail or Outlook. Login to your EmailJS account and click on "Create a New Service". Choose your email service provider from the list and follow the prompts to set up the service.
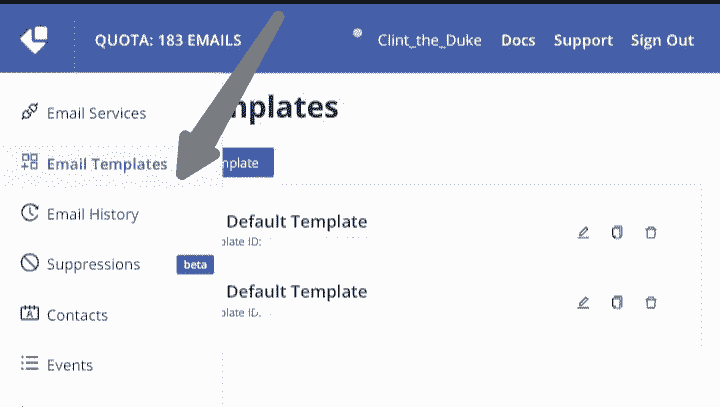
Create a New Template:
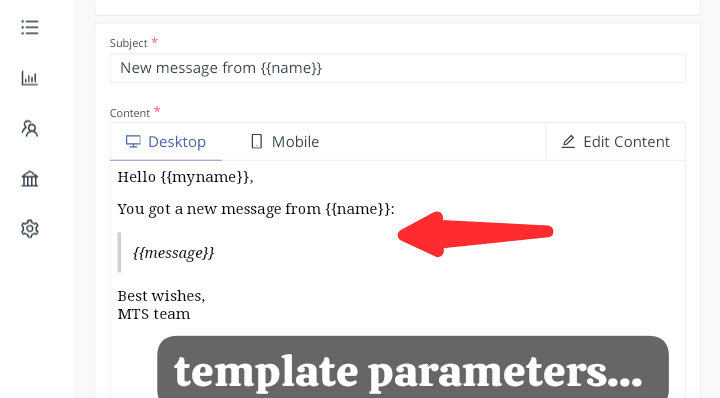
In EmailJS, the template defines the structure and content of the emails. Click on the "Create a New Template" button to create a new email template.
The "{}"
is a means for defining dynamic data, the values defined in the curly braces act as reference in the parameters defined in your code....
1. Installing the EmailJS SDK in your code
This can be done using npm or yarn
Add an EmailJS plugin or cdn link in the head section of your page to get started:
This is the part where you write some code to handle exactly what you want to see when receiving the emails.
The HTML:
<body>
<div id ="msgme">
<form action="">
<label for ="mail">Email:</label>
<br>
<input type ="email"id ="mail">
<br><br>
<label for ="msg">Message:</label>
<br>
<textarea id ="msg"></textarea>
<br><br>
<center><span id ="submit">Send Message</span></center>
</form>
</div>
</body>
This HTML code creates a form designed to handle user interaction. The purpose of this form is to collect the user's email address and a message to send.
          document.addEventListener("DOMContentLoaded",()=>{
let mail = document.getElementById("mail")
let msg = document.getElementById("msg")
let submit = document.getElementById("submit")
submit.onclick = ()=>{
    if(mail.value!=""&&msg.value!=""){
    var templateParams = {
  myname:"Your_Name",
  name: mail.value,
  message: msg.value
};
//emailjs.send(' your service_key','your template id', parameters)
emailjs.send('your_service_key', 'your_template_id', templateParams)

  .then(function (response) {
    console.log('SUCCESS!', response.status, response.text);
  }, function (error) {
    console.log('FAILED...', error);
  })
  }
  else{
      alert("Please fill essential details")
      //swal("Please fill essential details","","warning")
      //(for sweetalert library...)

  }
}


})
This JavaScript code simply checks if the email and message fields from the HTML form are filled. If they are, it sends an email using the EmailJS service.
Ensure to add your "service key" and your "template id" which can be gotten from the EmailJS Dashboard.
(Notice how the property names of your object eg "myname", tally with the values provided in the curly braces "{}" of your template).
In summary, EmailJS simplifies the process of sending emails directly from your website without requiring backend setup. You could sign up for a free account with them, and follow these guides to get started.
This helps frontend developers be more contactable as potential clients could view your work and message you directly from your frontend site!